Canadian Butter Tarts (video)
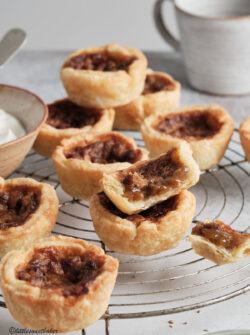
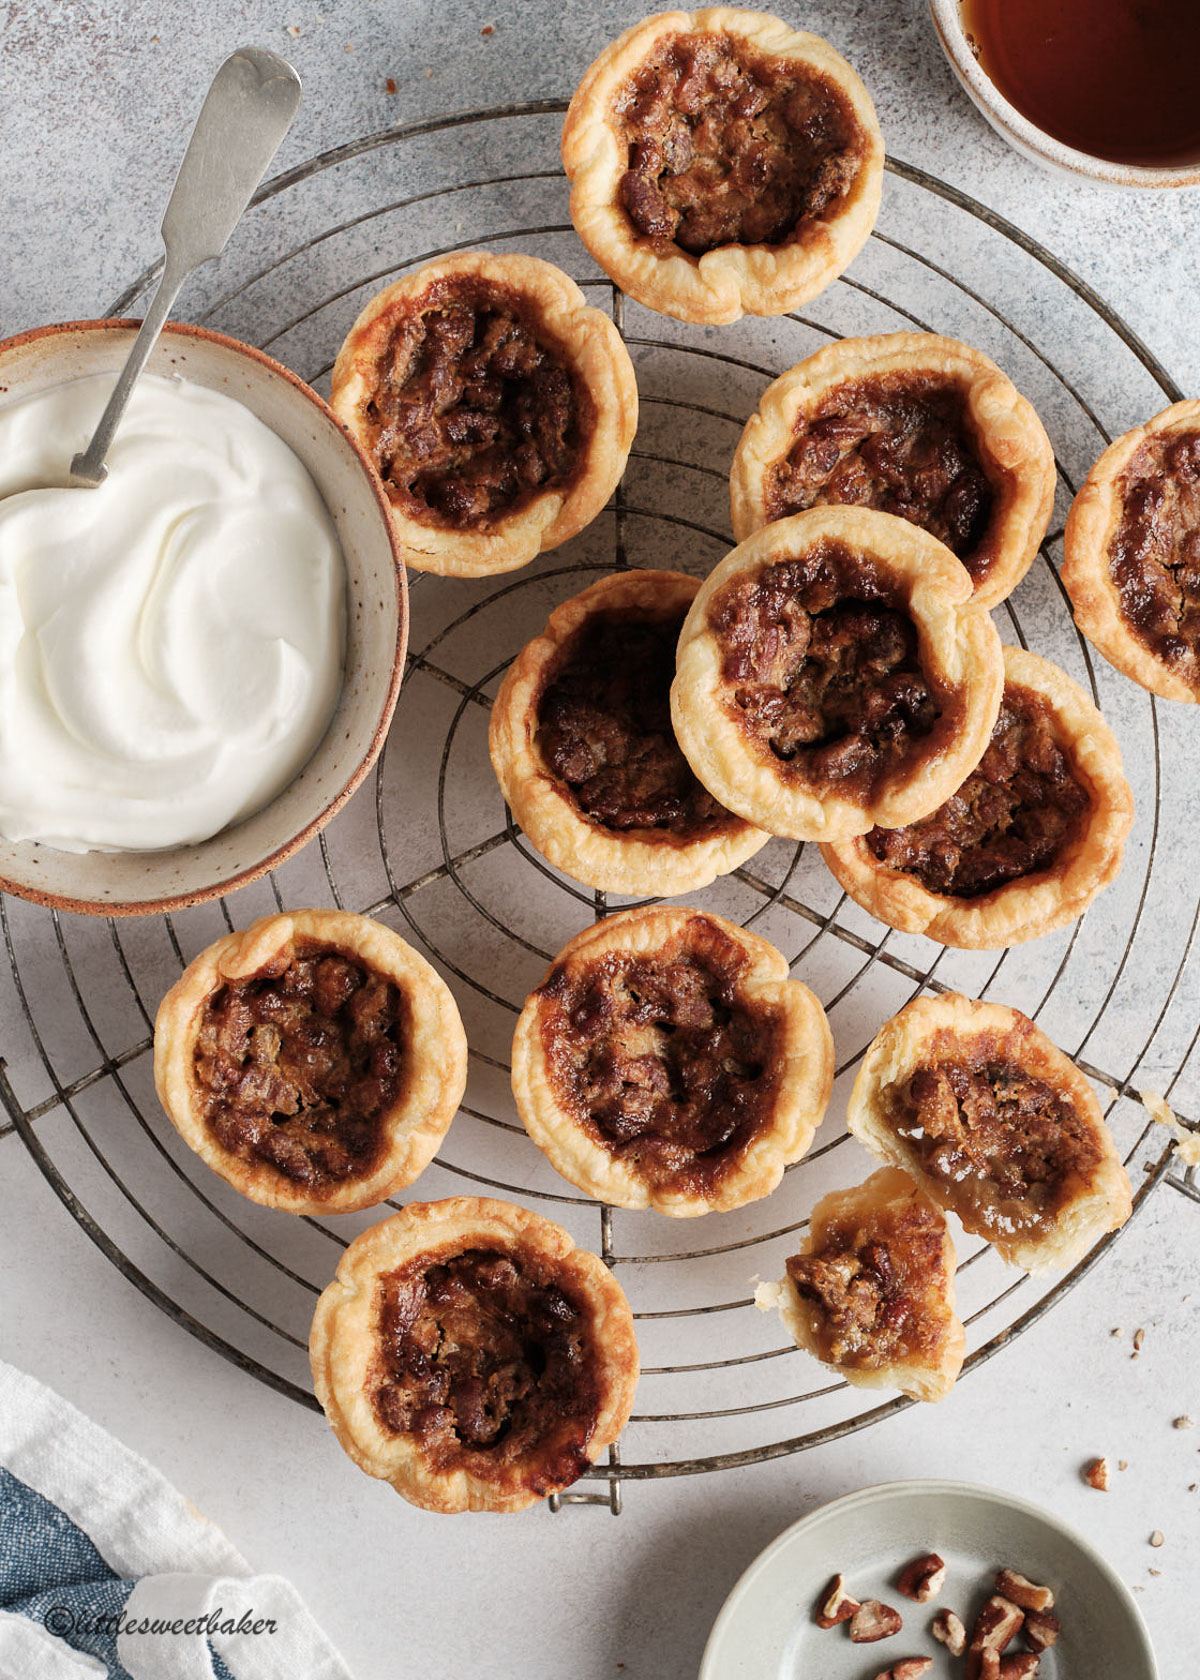
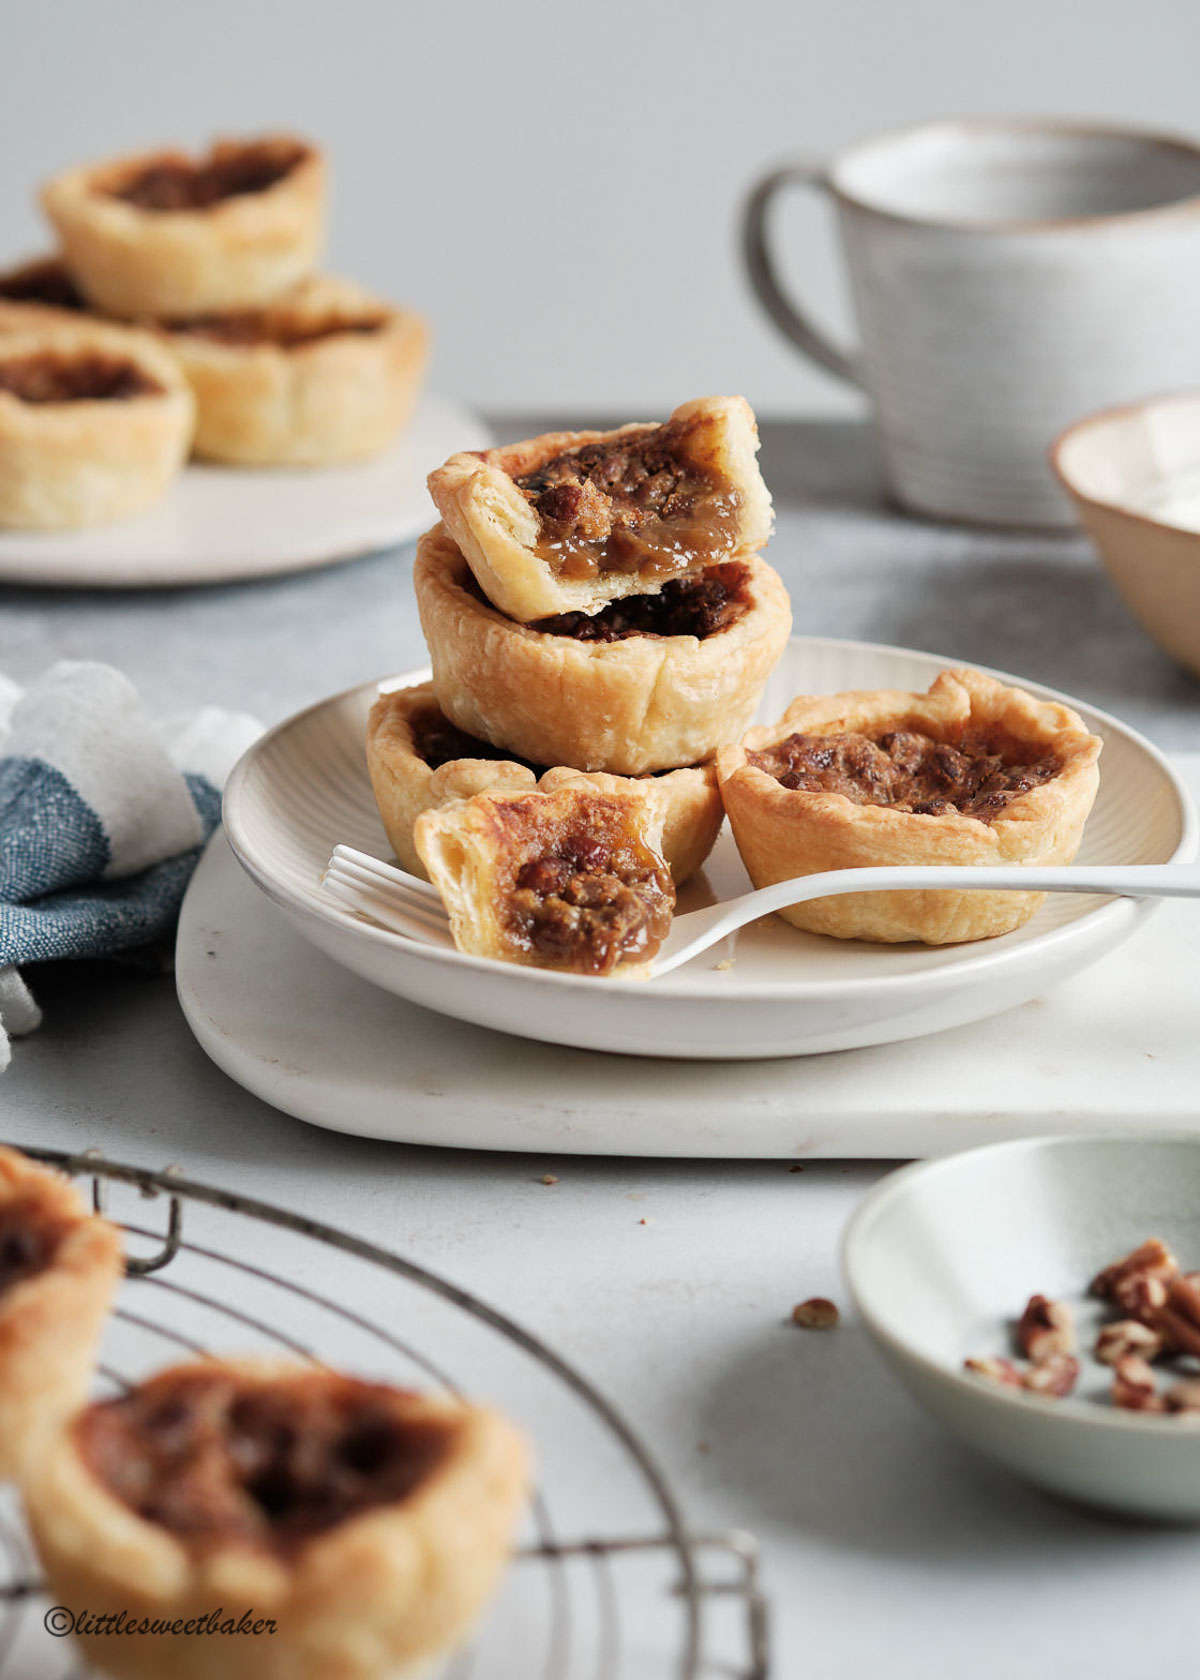
These famous Canadian butter tarts consist of a flaky pastry shell filled with a rich buttery caramel centre. They are a perfect sweet indulgence whether you’re Canadian or not.

What is a butter tart?
A butter tart is a small pastry tart filled with a deliciously gooey semi-solid syrup made up of butter, sugar, and eggs. Often dried fruit or nuts are added to the filling. These sweet little gems are said to have originated in Quebec back in the 1600s. Though, the first printed recipe for butter tarts was published in The Women’s Auxiliary of the Royal Victoria Hospital Cookbook in 1900, out of Barrie, Ontario.
The original version of Canadian butter tarts was made with maple sugar, freshly churned butter, and dried fruit such as raisins or currents. Butter tarts became all the rage in the 1920s and 1930s. It’s one of the few authentically Canadian recipes that exist on paper. (source: Food Network Canada and Food Blogger of Canada) Whether a true butter tart has a runny or firm filling, plain or with raisins, is a matter of passionate national debate. For me, it’s a matter of personal preference with no right or wrong.
Why this recipe is so great:
- Super flaky AND buttery tart shell – By using both butter and lard in this recipe, you achieve that flakiness you only get from using lard and that lovely buttery flavour you only get from using butter. It’s the best of both worlds.
- Rich and intensely flavourful filling – The filling is made with brown sugar and butter, so there is a deep molasses flavour from the sugar and smoothness from the butter. There is a splash of cream and vanilla added for more flavour and richness. An egg is added to help thicken the filling while it bakes. There is no fussing with corn syrup or maple syrup in this recipe.
- Easily adaptable – I love adding chopped pecans to the filling for some crunch and a nutty flavour. However, if pecans are not your thing, you can add raisins, dried currants, walnuts, chocolate chips, bacon (not a typo) or just leave them plain.
Ingredients you’ll need and why:
- All-purpose flour – Provides structure for the pastry by forming gluten when mixed with water, giving the dough its necessary elasticity and strength to hold its shape during baking.
- Baking powder – Acts as a leavening agent, creating a lighter and flakier texture by releasing carbon dioxide during baking, which helps the pastry rise.
- Salt – Enhances the overall flavour of the pastry by balancing the sweetness of the filling and also strengthens the gluten network for better dough stability.
- Lard – Contributes to a flaky texture because of its unique fat composition and higher melting point, which creates distinct layers in the pastry.
- Unsalted butter – Adds a rich flavour and helps in creating flaky layers; the water content in butter turns to steam during baking, which separates the dough layers. Butter also provides a smooth, creamy texture and adds richness to the filling, contributing significantly to the mouthfeel and flavour.
- Eggs – Add richness and moisture to the dough. They also act as a binding agent that helps set the filling, giving it structure and preventing it from being too runny while adding a smooth, custard-like consistency.
- White vinegar – Slightly inhibits gluten formation, resulting in a more tender and flaky pastry.
- Cold water – Hydrates the flour, allowing gluten to form, and keeps the fats (butter and lard) solid until baking, which is essential for achieving a flaky texture.
- Brown sugar – Sweetens the filling and adds a deep, caramel-like flavour due to the molasses content, enhancing the richness of the tart.
- Table or whipping cream – Adds creaminess and richness to the filling, giving it a smooth texture.
- Vanilla extract – Enhances the overall flavour of the filling with its warm, sweet notes.
- Chopped pecans, walnuts, raisins, or chocolate chips – Adds texture and additional flavours; nuts provide crunch and a nutty flavour, raisins add chewiness and sweetness, and chocolate chips introduce a rich, chocolaty element.
How to make butter tarts:
(the ingredient amounts are listed in the printable recipe card further below)
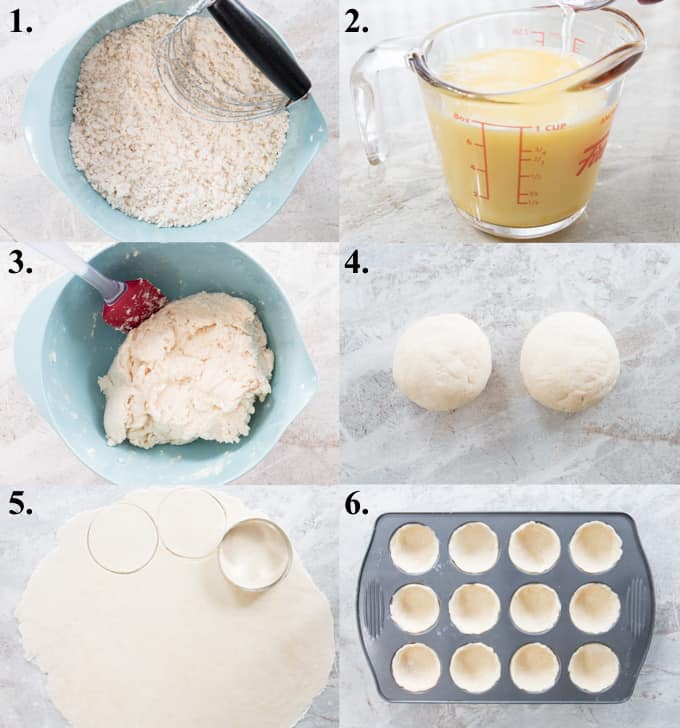
- You start by tossing together the flour, baking powder, and salt. Then cut in the butter and lard until it resembles coarse oatmeal.
- In a measuring cup, whisk together an egg and some vinegar. Add enough water to make one cup.
- Gradually stir in the liquid, adding just enough water to make the dough cling together.
- Turn the dough out onto a lightly floured surface and gather into a ball and divide into two equal portions. Tightly saran wrap both portions. Place one in the freezer for later use. Place the other in the fridge to chill for one hour.
- Roll the dough to about 1/8″ thick. Cut as many 4″ circles as you can. Re-roll the scraps and cut out more circles to make 12.
- Fit the pastry circles into a muffin pan and place back in the fridge until ready to fill.
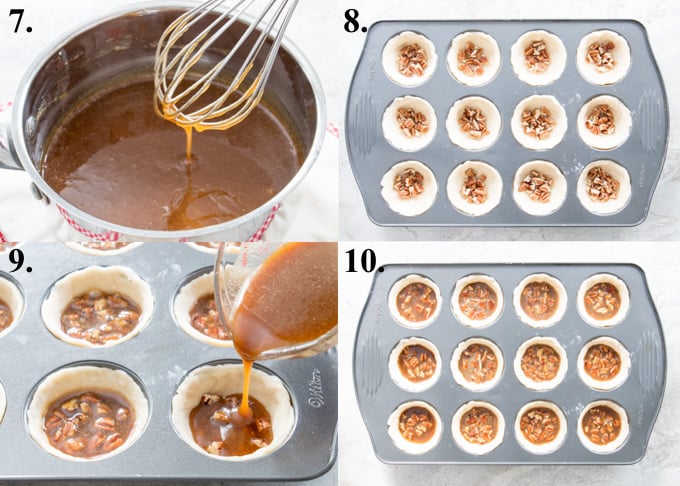
- In a small saucepan over medium heat, melt the butter and brown sugar until combined. Whisk in a splash of cream and vanilla extract. Let cool for 5 minutes and whisk in an egg.
- Divide any add-ins like pecans or raisins if using among the pastry.
- Pour in the butter tart filling just until half full.
- Bake at 375F for 13-15 minutes or until crust is lightly golden and filling is bubbling.
Expert tips:
- Use softened butter and lard – I know this goes against all pie crust rules, but I find it much easier and faster to cut softened butter and lard than cold. And since you’re going to be placing back in the fridge to chill for an hour and again when you are preparing the filling, the fats will re-solidify, creating that layer upon layer of flaky crust.
- Bake in the lower third of oven – This will help the bottom of the tarts turn golden at the same time the edges are done.
- Best way to remove tarts from the pan – Let the tarts cool in the pan, place a cooling rack (upside down) on top and flip the pan over. Then flip each butter tart right-side up. If any of the butter tarts are stuck to the pan, use a fork to gently loosen and remove.
FAQ:
This is a matter of personal preference. I much prefer a traditional flaky pie crust. To me, it’s not a butter tart if it’s made with any other type of pastry. However, if you prefer a lighter tart shell or you’re press for time, then yes, you can use puff pastry.
Butter tarts do not need to be refrigerated if they will be consumed within a day or two and can be stored at room temperature in an airtight container. For longer storage, it’s best to store them in the fridge to keep them fresh.
Yes, butter tarts freeze really well. Place completely cooled tarts in an airtight freezer-friendly container or ziplock bag. Label with the date and store in the freezer for up to 3 months. For best results, freeze the day they were baked. Thaw overnight in the fridge and reheat in the oven at 350F for about 10 minutes.
Butter tarts can be stored in an airtight container for up to 2 days at room temperature or up to 5 days in the fridge. If storing in the fridge, you can eat them cold or bring them to room temperature before serving. After 3 days, it’s best to freshen up the tarts in the oven at 350F for 5-10 minutes to re-crisp the pastry.
You might also like:
The texture of these butter tarts is flaky and crumbly with a sticky-gooey centre. The taste is buttery with a warm caramel flavour. These butter tarts are a simple treat with a decadent flair.
Did you make this recipe? Please kindly leave a comment with your star rating below.
BEST Canadian Butter Tarts
Ingredients
Makes 12 butter tarts
Pastry
- 3 cups (375g) all-purpose flour, plus more for dusting
- 1/2 tsp baking powder
- 1/2 tsp salt
- 1/2 cup (114g) lard, room temperature
- 1/2 cup (114g) unsalted butter, room temperature
- 1 large egg
- 1 tsp white vinegar
- about 1 cup (250ml) cold water
Filling
- 3/4 cup (165g) packed brown sugar
- 1/3 cup (75g) unsalted butter
- 1 Tbsp table or whipping cream
- 1 tsp vanilla extract
- 1 large egg
Optional
- 1/2 cup chopped pecans, walnuts, raisins or chocolate chips
Instructions
- In a large bowl, toss together the flour, baking powder and salt.3 cups (375g) all-purpose flour, 1/2 tsp baking powder, 1/2 tsp salt
- Cut in the lard and butter using a pastry blender or two knives until mixture resembles coarse oatmeal.1/2 cup (114g) lard, 1/2 cup (114g) unsalted butter
- In a measuring cup, combine the egg and vinegar. Add enough cold water to make one cup.1 large egg, 1 tsp white vinegar, about 1 cup (250ml) cold water
- Gradually stir in the liquid, adding just enough to make the dough cling together.
- Turn the dough out onto a lightly floured surface and gather into a ball and divide into two equal portions.
- Tightly saran wrap both portions. Place one in the freezer for later use. Place the other in the fridge to chill for one hour.
- Roll the dough on a floured surface to about 1/8" thick. Cut as many 4" circles as you can. Re-roll the scraps and cut out more circles to make 12.
- Fit the pastry circles into a muffin pan and place back in the fridge until ready to fill.
- Preheat oven to 375F and position a rack in lower third of oven.
- In a small saucepan, melt the butter and brown sugar.3/4 cup (165g) packed brown sugar, 1/3 cup (75g) unsalted butter
- Remove from heat and stir in the cream and vanilla. Let cool to touch (about 5 minutes) before whisking in the egg.1 Tbsp table or whipping cream, 1 tsp vanilla extract, 1 large egg
- Divide the pecans (if using) among the pastry shells and pour in the filling until half full.1/2 cup chopped pecans, walnuts, raisins or chocolate chips
- Bake for 13-15 minutes or until crust is lightly golden around the edges and filling is bubbling.
- Let cool completely in the pan. Best way to remove the tarts from the pan is to place a cooling rack (upside down) on top and flip the pan over. Then individually flip each butter tart right side up.
Notes
This post was originally published on June 15th, 2017 and has been recently updated with new photos.


Hello I’ve used this recipe before and absolutely love it. I currently have a disc of extra pie crust dough in my freezer. It’s a different recipe but still a classic pie crust. Can I use this to save time or do these tarts need this specific pie crust recipe
Yes, you can use your leftover pie crust from the freezer. Enjoy and happy baking!
I made this following your recipe. It is delicious! I added raisins to some of the tins. They came out of the tins with ease. I used barquette tins and mini false bottom ones. I only heard of these from Sloan Bella who is a medium on YouTube. She is Canadian now living in Los Angeles and she was always saying her friends send her butter tarts and I had to look it up. Yum!! I thought it was going to taste like pecan pie but it doesn’t. It is a bit lighter. Thanks for the recipe!!
Hi Lily, butter tarts are my favourite! I’m going to use your crust recipe but will stay with using my own filling recipe that has honey and maple syrup.
Your suggestion to put a pan on top and flip them over to get them out of the tart shells wouldn’t work for my recipe. I like semi-runny and I’m afraid the filling would be a goopy mess. I use the method below (I read this long ago on the Net)
Here’s a tip for those who have a hard time getting the tarts out of the shells… cut strips of parchment paper and put a 1″strip in each shell with loose ends sticking up. After they have cooled, just pull up on the loose ends and out they come. No circling around with a knife needed.
Brilliant and thank you for sharing that tip using parchment strips!
That’s a lot of pastry dough, I usually make 36 butter tarts with that amount of dough 🙂
It’s a double pie crust recipe so there is enough to make 24 tarts in a muffin pan. If you are using aluminum tart molds which are smaller, I can see getting 36 out of it.
These sound fantastic but I have a question. When you say to use lard, can you use a shortening like Crisco ?
You can but it won’t be flaky. It’s best to use lard for a flaky and tender pie crust.
Absolutely delicious and so easy to make. I used the pillsbury premade pie crusts to cut the time in 1/2. Start to finish I was done it was done in about 25 minutes!
My go to recipe for the best butter or pecan tarts. Everyone raves!
I am very excited to try this ‘all Canadian’ recipe for authentic Butter Tarts. My only additional comment, and don’t laugh, concerns the use of American spellings in your recipe. You’ve spelled ‘center’ when you could have used ‘centre’. You’ve spelled ‘color’ when you could have used ‘colour’. You’ve used ‘flavor’ when you could have used ‘flavour’. If you’re going to write to Canadians about authentic Canadian recipes, then use Canadian Spellings. It may seem like a mute point, but after all, we are Canadians and we need to protect the little things that make us Canadians, like authentic Canadian Butter Tarts!
Fair point and I’ve struggled with this because even though I’m Canadian, 65% of my readers are American and only 20% are Canadian, so I’ve made the business decision to cater to the majority of my audience. But maybe for the Canadian recipes I can change the spelling so it’s more authentic. You’ve definitely given me some food for thought.
This might be the best thing I have ever eaten, and I don’t even have a sweet tooth. These came out absolutely perfect and I love the crust to filling ratio. The crust recipe, by the way, is absolutely fantastic. Not too crumbly or too flaky but still has an airy texture.