Easy Sugar Cookies
These cut-out sugar cookies are soft and buttery, and taste amazing. They are just as fun and easy to make as they are to eat!
I’m completely behind on my Christmas decorating this year. We have most of our outdoor decorations done thanks to my husband. However, we don’t have our tree decorated yet (thanks to me). What can I say, I’ve been busy in the kitchen because ’tis the season for Christmas cookies! And nothing says Christmas more than decorated cut-out sugar cookies.
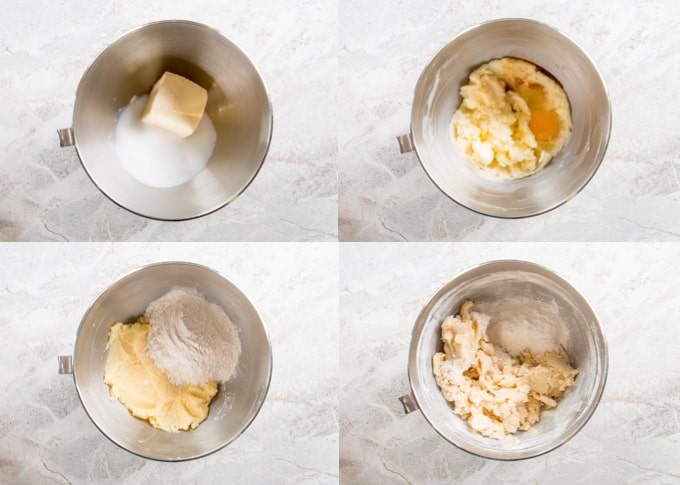
This recipe begins with creaming the butter and sugar together. There’s only one cup of sugar in this recipe so the cookies are not too sweet, which leaves room for lots of icing and sprinkles. Next you beat in your egg, vanilla extract, and a dash of almond extract. The almond extract is optional, though I always add almond to my sugar cookies because it balances the richness from the butter and the egg. It also rounds out the flavor of the cookies. The little added touch of almond extract really takes these cookies from ordinary to extraordinary, so I highly recommend it. Then you mix in your dry ingredients, one cup at a time.
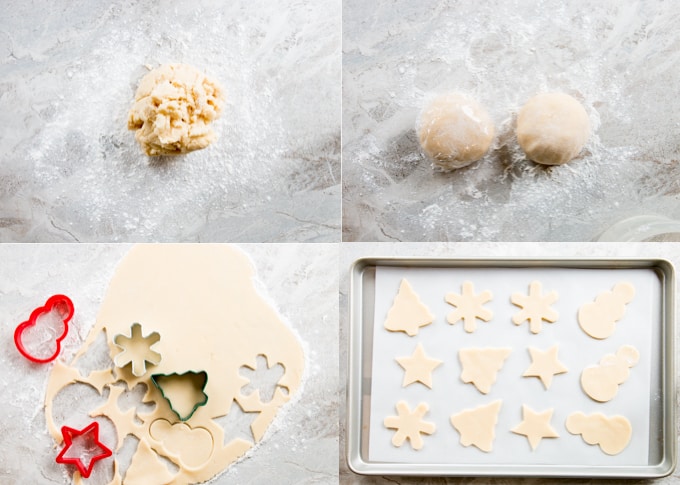
Once that’s done, you turn out your dough onto a floured surface. Knead it a few times and divide the dough into two equal parts. Cover one part in plastic wrap while you roll out the other part. Cut into fun shapes. Bake and let cool, and decorate as desired. The nice thing is that there is no chilling required with this recipe and the dough is easy to work with. It’s not too stiff but will hold its shape nicely during baking.
The recipe makes quite a few cookies (3-4 dozen) so you can make it all at once or save the other half for a later use. If saving, wrap the dough in plastic wrap and place in ziplock bag. Store in the fridge for up to 3 days or in the freezer for up to a month. When ready to use, thaw and bring to room temperature before rolling.
I’m not a master decorator by any means, so I styled my cookies pretty simply and made them festive with sprinkles. I also used a very basic icing recipe: just powdered sugar, milk and a little vanilla. I didn’t fuss with making royal icing because I was decorating with sprinkles and just needed a “glue”. I dressed my star and tree cookies by outlining my design with the icing. Then I placed them, icing side down, onto a small plate of sprinkles. I did the same thing with my snowflake cookies and added a few pearls. I found that was the best way to get good coverage with the sprinkles. Sprinkling them didn’t work for me. Most would just bounce off the cookie.
These sugar cookies are soft and tender, yet firm enough to hold their shape and decorate. The taste is rich and buttery with a hint of vanilla.
Print
Easy Sugar Cookies
- Prep Time: 30 min
- Cook Time: 8 min
- Total Time: 38 minutes
- Yield: 3-4 dozen
- Category: dessert, snack
- Method: bake
- Cuisine: American
Description
These cut-out sugar cookies are soft and buttery, and taste amazing. They are just as fun and easy to make as they are to eat!
Ingredients
Cookies
- 2 & 3/4 cups (345g) all-purpose flour
- 2 tsp baking powder
- 1/2 tsp salt
- 1 cup (227g) unsalted butter, softened
- 1 cup (200g) granulated sugar
- 1 large egg
- 1 tsp vanilla extract
- 1/2 tsp almond extract (or vanilla extract if you don’t have almond)
Icing
makes about 1 cup (see notes**)
- 2 cups (250g) powdered sugar, sifted (very important to sift so there are no clumps)
- 1/2 tsp vanilla extract
- 2–3 tbsp milk
Instructions
- Preheat oven to 350F and line two baking sheets with parchment paper.
- In a medium bowl, toss together the flour, baking powder and salt. Set aside.
- In a large bowl, cream together the butter and sugar. Beat in the egg and extracts until combined.
- Add in the flour mixture, one cup at a time, mixing after each addition. The dough will be crumbly after the final addition.
- Turn the dough out onto a floured surface. Knead a few times to gather all the dough together. Divide into two equal parts. Cover one part in plastic wrap.
- Roll the dough on a floured surface until it’s 1/4″ in thickness. Cut out desired shapes. Use a metal spatula to transfer onto prepared baking sheets. Re-roll the scraps if desired for more cookies. Repeat with remaining dough or store for later use (see notes*).
- Bake for about 8 minutes or just until the edges start to brown. As soon as you see color along the edges, remove cookies from oven. Let cool completely on baking sheet before decorating.
- To make the frosting; add the vanilla to the powdered sugar. Whisk in the milk, one tablespoon at a time until you reach a thick but pourable consistency. You want to be able to squeeze the icing out of a small tip but you don’t want it to spread on the surface of the cookies. You want it to make nice clean lines.
- Pour the icing into a squeeze bottle with a small tip or in a piping bag and cut a tiny opening. Decorate as desired by adding color or topping it with sprinkles.
Notes
*To store the remaining dough for later use: Tightly wrap in saran wrap and place in ziplock bag. Store in the fridge for up to 3 days or in the freezer for up to a month. When ready to use thaw and bring to room temperature before rolling. Bake as instructed.
**Feel free to reduce the amount of icing in half if you are only planning to baking half the cookies. You can also store it in an airtight container in the fridge for up to 3 days and bring to room temperature before using.
Baking times will vary depending on the size and thickness of your cookies as well as your oven. It can vary from 6-10 minutes. My cookies took exactly 8 minutes.
Recipe adapted from One Little Project.







Hi there,
I was wondering, do you think there is a suitable substitute for the egg in this recipe that wouldn’t compromise the flavor, texture and workability of the dough?
Thank you.
Wow, love the look of them, they are fantastic!!
Thanks Dave! Have a very merry Christmas. Hugs:)
I tried this recipe today without icing, and it came out tasting great. The cookies were amazing. When I got to the end though the dough wouldn’t roll out. It turned really crumbly. I even tried to knead it like when you start and it didn’t work. The rest of it was good, they looked good and tasted amazing. I just didn’t like how crumbly the dough turned out.
Hi Leilani,
I’m sorry the dough was dry by the end. Whenever that happens in any recipe, you can wet your hands with water and knead the dough to add some moisture and bring it back together. I hope that helps for next time. and thank you for your feedback.
These cookies are just adorable and I love the simplicity of the decorating. It makes them more elegant. Happy Holidays Lily!
I want these now, they look so good. Thanks for sharing on Fiesta Friday group.
You’re very welcome and thank you for the visit! xoxo
I guess I’m not alone who love to cut out cookies 😀 and the eat them
Yours looks lovely!
Thank you Mila! xoxo
The cookies looks so cute..Am sure kids will love it
Oh they will. My kids couldn’t get enough. Enjoy and have a great weekend!
So pretty, Lily! 😍😍
Thanks Angie! xoxox