Best Scone Recipe

Learn how to make the BEST scones of your life! The beauty of this master scone recipe lies in its adaptability. With a tender crumb, crisp edges, and a rich buttery flavor, these scones are perfect on their own or as a base for endless variations.

Why you’ll love this recipe:
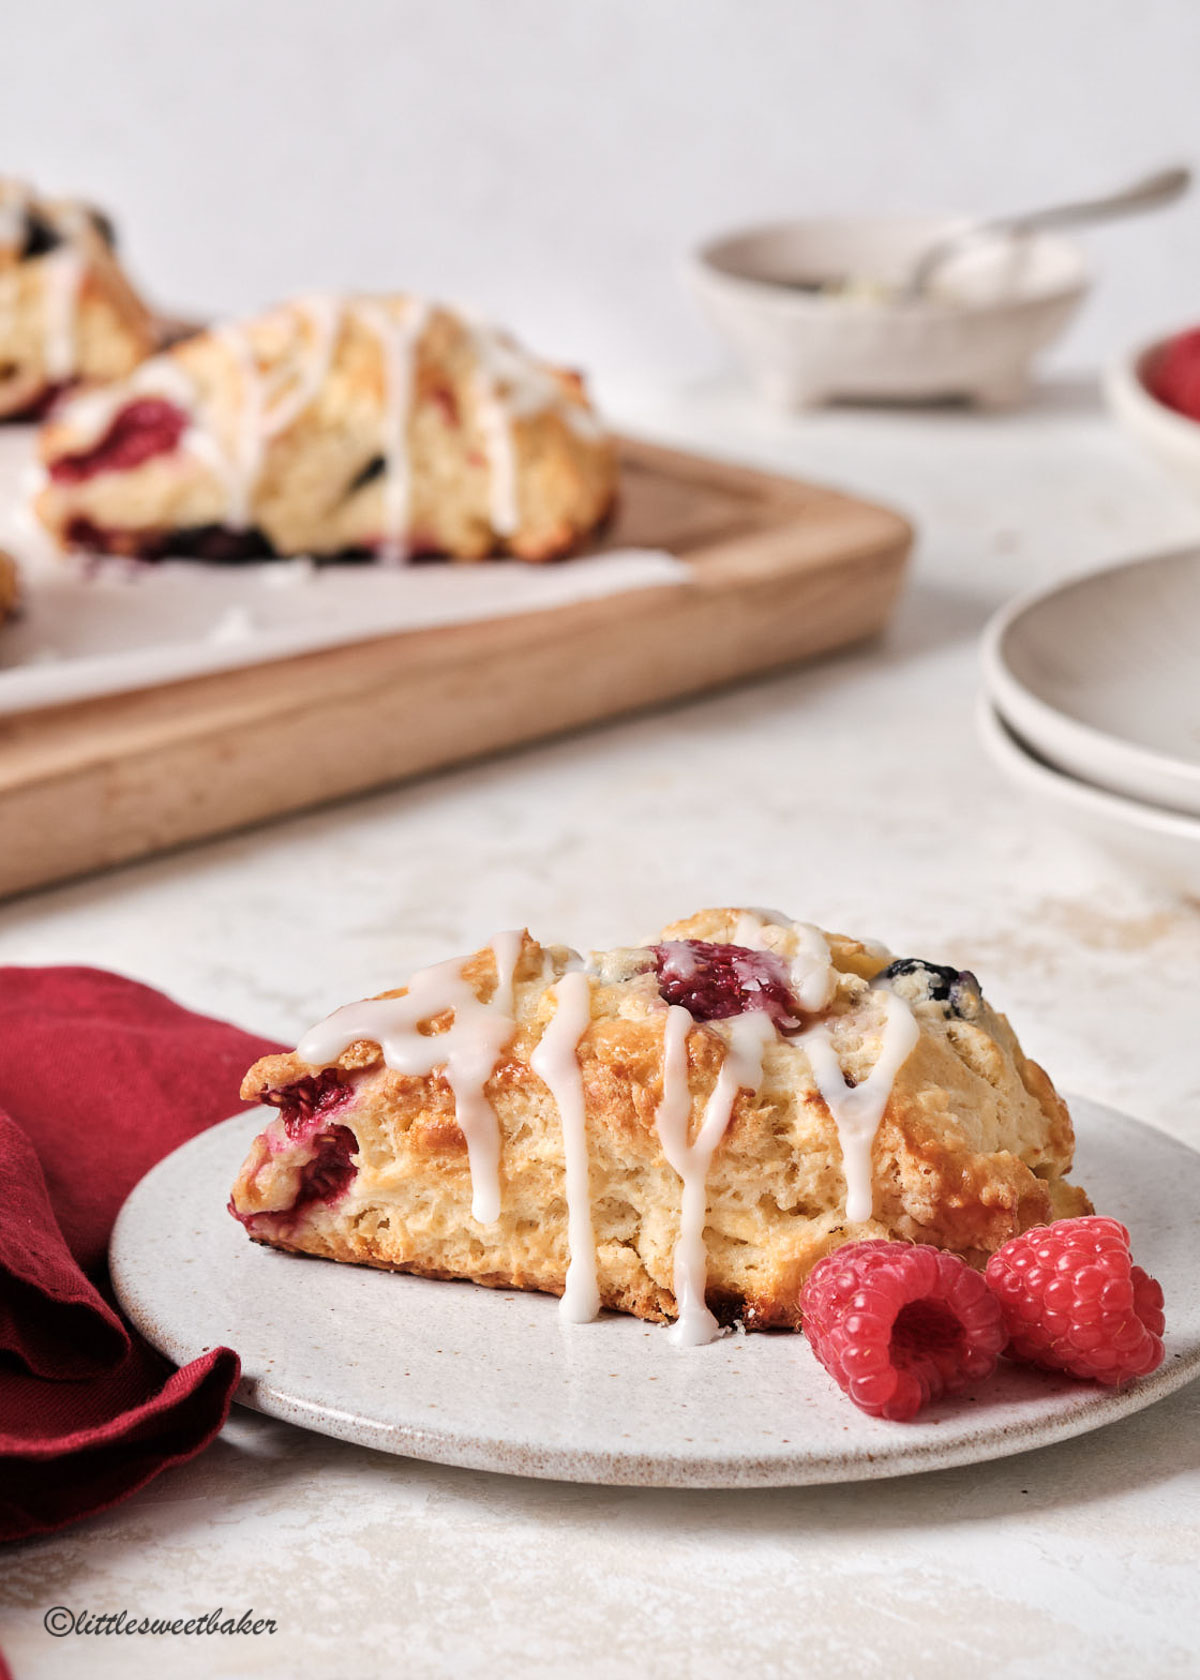
Some people might think of scones as dry, hard, and bland bricks of pastries, but I guarantee you this recipe is not like that at all. With this recipe, you get a very buttery and moist scone with a soft and tender inner crumb. The exterior is crunchy and baked to golden perfection.
- Versatile – This scone recipe is a perfect base for endless flavor variations. Whether you prefer sweet scones with fruit and chocolate or savory options with cheese and herbs, this recipe can be easily adapted to your cravings.
- Perfect Texture – The combination of cold butter and a light touch in mixing ensures that these scones have a tender, flaky texture, and a crispy exterior. The result is a scone that is moist and not too dense.
- Easy to make – This recipe is easy enough for beginners, yet satisfying even for seasoned bakers. With only 15 minutes of prep and 20 minutes in the oven, you can have freshly baked scones to your liking in under an hour.
If you love scones, you must also try my Best Blueberry Scones, Cranberry Orange Scones, and Glazed Pumpkin Scones. For a mix of sweet and savory, try these Feta Cheese & Blueberry Scones.

Ingredients you’ll need and why:
- All-purpose flour – Provides the structure and base for the scones, creating the dough’s bulk and texture.
- Granulated sugar – Adds sweetness and helps create a tender crumb by interacting with the other ingredients.
- Baking powder – Acts as a leavening agent, causing the scones to rise and become light and fluffy.
- Salt – Enhances the flavor of the scones and balances the sweetness, also helping to strengthen the dough.
- Unsalted butter – Contributes richness and flavor, while its cold, solid form helps create flaky layers in the scones.
- Buttermilk – Adds moisture and tenderness, and helps to activate the baking powder for a better rise. Also used onto brush the scones for a more golden outer crust.
- Egg – Binds the ingredients together, adds richness, and helps with the scones’ structure and rise.
- Vanilla extract (for sweet scones) – Enhances the sweetness and adds a warm, aromatic flavor.
- Optional add-ins and toppings – 1-2 cups of sweet or savory mix-ins and toppings like coarse sugar or glaze.
How to make the best scones:
(the ingredient amounts are listed in the printable recipe card further below)
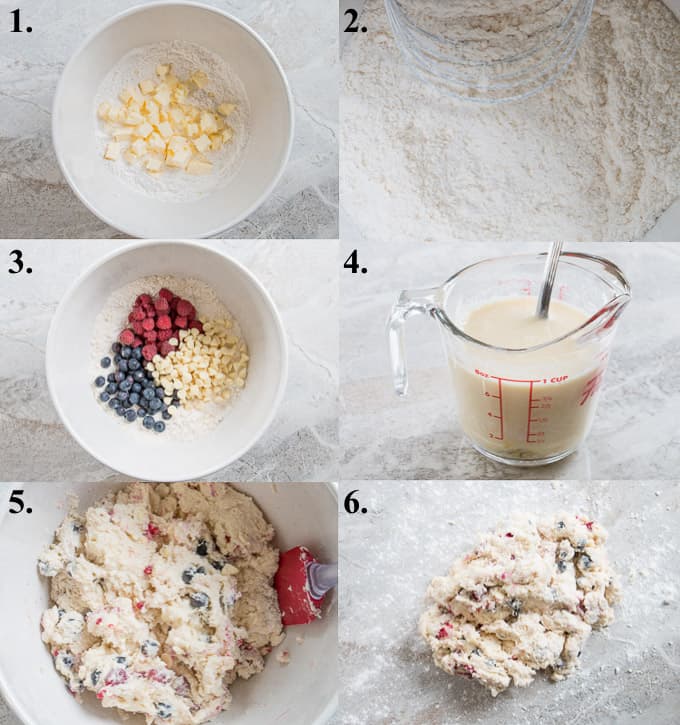
- Start by tossing together the flour, sugar, baking powder, and salt in a large mixing bowl. Then add in the cold butter.
- Work in the butter using a pastry cutter, fork, or two knives until the mixture resembles coarse meal with some larger pieces remaining.
- Toss in your add-ins.
- Whisk together the buttermilk, egg, and vanilla (if making sweet scones).
- Pour the wet ingredients over the dry ingredients and mix just until all is moistened.
- Scrape the dough onto a floured surface.
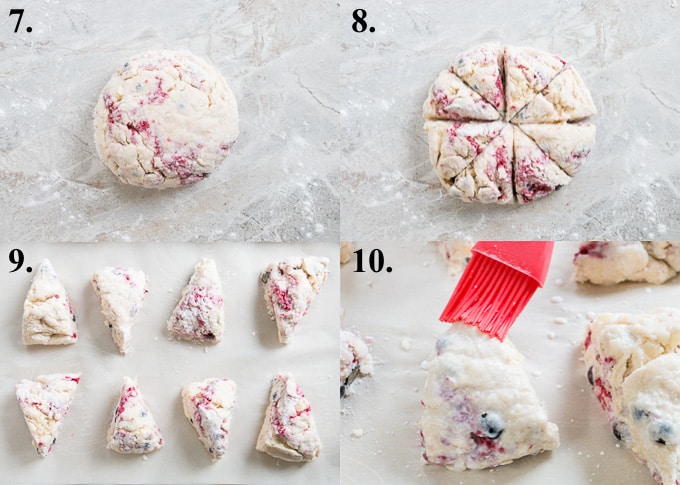
- With floured hands, gently knead the dough into a ball. It doesn’t have to be perfectly smooth – rough and shaggy is actually better.
- Flatten into a 6″ circle and cut into 8 wedges.
- Transfer onto a parchment paper-lined baking sheet and chill in the fridge for 20 minutes.
- Brush the surface with buttermilk and bake in a 400F oven for 20 minutes until golden brown.
Expert tips:
- Use cold ingredients. Using cold butter, milk, and egg is essential for this recipe because you want the butter to remain solid while you work the dough. The small pieces of butter in the dough are what give the scones their desirable texture. Cold butter creates steam as it melts in a hot oven. The steam from the melting butter expands between the layers of dough, yielding a soft and fluffy interior, while the fat on the surface of the dough coats it and creates a crispy outer shell.
- Be gentle and work quickly. When mixing your wet and dry ingredients together, gently mix until JUST combined and all appears to be moistened – that way you don’t create too much gluten. When kneading the dough into a ball, work quickly, so you don’t melt too much of the butter with your hands.
- Chill the dough. The key to this recipe is to let the scones chill in the fridge for 20 minutes while your oven preheats. This allows for the gluten in the flour to relax, which makes the scones more tender and enables them to rise higher. It also chills the fat, which makes the scones flakier.
Storing and freezing instructions:
Storing – Place the scones in an airtight container and store them at room temperature for up to 2 days, or refrigerate for up to 5 days.
To freeze unbaked scones – Place the wedges in the freezer until frozen solid, put them in a ziplock back, return to the freezer and store for up to a month. When ready to bake, let thaw overnight in the fridge, and bake as instructed.
To freeze baked scones – Let cool completely, place in a ziplock bag, and freeze for up to a month. When ready to use, thaw overnight in the fridge, and warm in the microwave for 30 seconds or on a baking sheet, lightly tented with foil, in a 350F oven for about 10 minutes.
Recipe FAQs:
The answer is no. However, scones that contain eggs are fluffier and rise higher than scones that don’t because eggs serve as a leavening agent in baked goods. Eggs also add flavor, moisture, and richness to the scones, so I highly prefer scone recipes that contain eggs.
Scones are supposed to be crunchy on the outside yet soft and moist on the inside. They should not be dry or crumbly.
To reheat, place them on a baking sheet lightly tented with foil, and warm in a 350F oven for about 10 minutes.
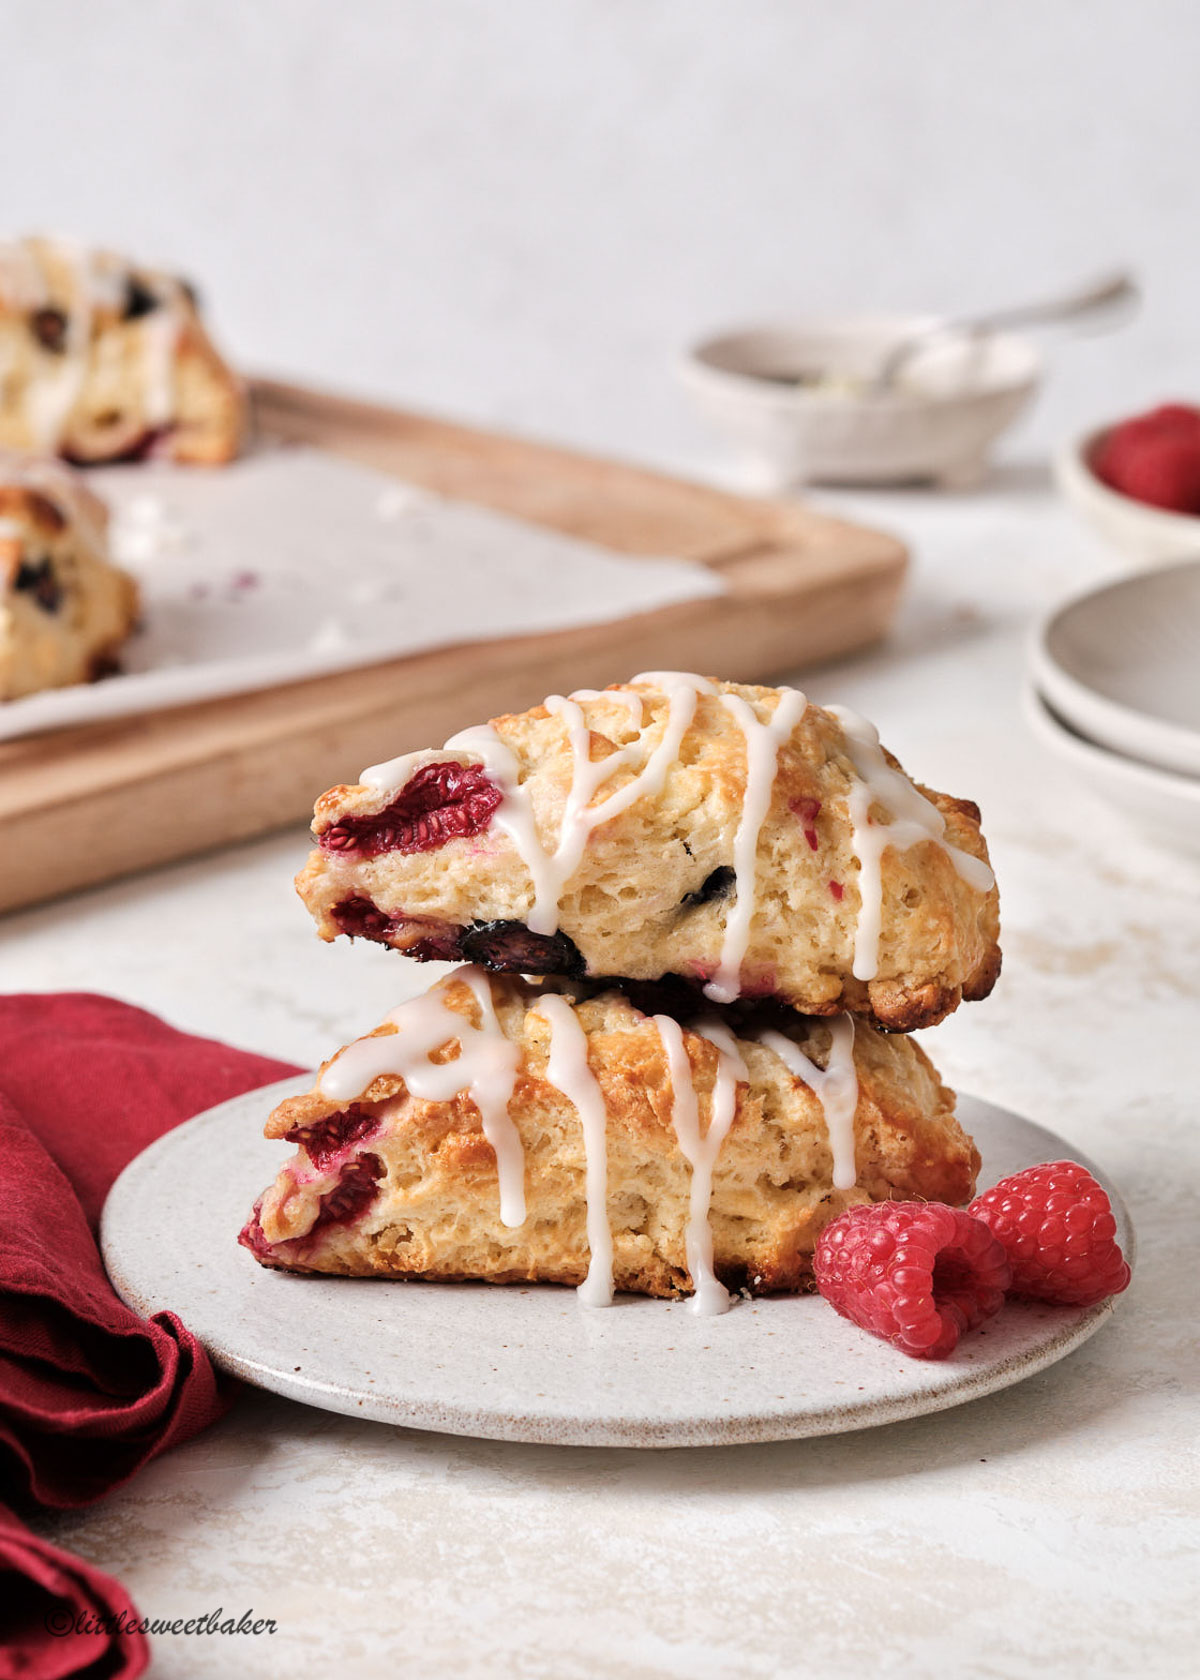
This recipe will serve as your basic go-to scone recipe with instructions on how to adapt it for sweet or savory, and mix-in options. What you see in the photos are sweet scones with white chocolate chips, blueberries, and raspberries as mix-ins. I used this same recipe to make my Chocolate Chip Scones. Watch the video below to see how easy it is to make.
If you’ve tried this Master Scone Recipe or any other recipe on my blog please leave a 🌟 star rating and let me know how it went in the 📝 comments below. Thanks for visiting!
How To Make The BEST Scones
Ingredients
- 2 1/2 cups (315g) all-purpose flour, plus more for work surface and kneading
- 2 Tbsp for savory or 4 Tbsp (for sweet) granulated sugar
- 1 Tbsp baking powder
- 1 tsp for savory or 1/2 tsp (for sweet) salt
- ½ cup (114g) cold unsalted butter, cubed
- ⅔ cup (160ml) cold buttermilk, plus more for brushing top of scones
- 1 large egg
- 1 tsp vanilla, for sweet only
Optional
- 1-2 cups add-ins, I used 1/2 cup white chocolate chips, 1/2 blueberries and 1/2 cup raspberries for this sweet scone version
- glaze or coarse sugar for topping
Instructions
- In a large bowl, toss together the flour, sugar, baking powder and salt.2 1/2 cups (315g) all-purpose flour, 2 Tbsp for savory or 4 Tbsp (for sweet) granulated sugar, 1 Tbsp baking powder, 1 tsp for savory or 1/2 tsp (for sweet) salt
- Work in the butter with a pastry cutter or fork until it resembles coarse meal with a few larger pieces remaining. Mix in any add-ins at this step if using.½ cup (114g) cold unsalted butter
- In a measuring cup, whisk together the buttermilk, egg, and vanilla (if making sweet scones).⅔ cup (160ml) cold buttermilk, 1 large egg, 1 tsp vanilla
- Pour the wet ingredients over the dry mixture. Gently stir with a rubber spatula until JUST combined and all appears to be moistened.
- Scrape the dough onto a floured work surface. With floured hands, gently and quickly knead the dough into a ball (sprinkle more flour if needed as you're kneading). It doesn't have to be smooth. Rough and shaggy is good.
- Pat out into a 5" circle if making plain scones, or 6" circle if you have incorporated any add-ins.
- Cut into 8 wedges and place 2" apart onto a parchment paper or silicone mat lined baking sheet. Chill uncovered in the fridge for 20 minutes while you preheat your oven to 400F.
- Brush the tops of the scones with more buttermilk and top with coarse sugar if using.
- Bake for about 20 minutes or until golden brown. Transfer the scones to a cooling rack.
Notes
Sweet scone variations:
White Chocolate, Cherry, and Pecan Scones: Add 1/2 cup dried cherries, 1/2 cup white chocolate chips, and 1/2 cup pecans.
Chocolate Chunk Scones: Add 1 - 1 1/2 cups of chocolate chunks (milk, semi-sweet, dark or mix).
Double Chocolate Chunk Scones: Substitute 1/4 cup cocoa powder for 1/4 cup of the all-purpose flour; add 1 cup chocolate chunks and 1/2 teaspoon espresso powder.
Toasted Coconut Lime Scones: Add 3/4 cup toasted unsweetened shredded coconut and 1 tablespoon lime zest. For extra coconut flavor, use coconut milk in place of the dairy called for in the recipe.
Roasted Strawberry and Pistachio Scones: Toss 2 cups sliced or quartered strawberries with 1 tablespoon sugar. Spread them on a parchment-lined baking sheet and bake at 425°F for about 20 minutes, or until jammy-looking. Let the berries cool before stirring them into the dry ingredients with 1/2 cup chopped pistachios.
Lemon Blueberry Scones: Add 2 cups blueberries and 1 tablespoon lemon zest.
Triple Cinnamon Scones: Add 2 teaspoons ground cinnamon (to the dry ingredients) and 1 cup cinnamon chips. Savory scone variations:
Cheddar, Basil, and Sun-Dried Tomato Scones: Add 1 cup grated cheddar, 1/4 cup chopped fresh basil (or 2 tablespoons dried basil), and 1/2 cup chopped sun-dried tomatoes (not packed in oil).
Cheddar, Bacon, and Chives: Add 1 cup grated cheddar, 1/2 cup cooked crumbled bacon, 2 tbsp finely chopped fresh chives (or 2 tsp dried).


Absolutely scrumptious! The dough can be sticky and taking the rough and shaggy look literally produced a wonderful crunchy top.
This is my go to master scone recipe. I have made numerous variations of flavours, and never had a failure. I use a mixture of milk and plain yogurt (as I always have that on hand) in place of the buttermilk. Seems to work fine for me. Thank you for posting.
You’re very welcome and thank you for your wonderful feedback!
I made these with craisins and orange zest and they were very good. Light and airy and puffed up nicely.
I have made these scones many many times. They always turn out amazing and the combinations are endless.
My favorite mix-ins are roasted tomatoes (seeds removed and blotted to remove excess moisture—about ½ to ⅔ cup), along with either cheddar or mozzarella cheese (also ½ to ⅔ cup). I add 1–2 teaspoons of Italian seasoning and some minced garlic to taste. Then I top them with freshly grated Parmesan for a nice crunchy finish. Pizza scones!
I made with gluten free flour and had to add a tiny bit more milk (the nature of gluten free sometimes), but these were delicious! I love how they are not packed with sugar. The raspberries I added made them just sweet enough, just as scones should be. Keeping this recipe and going to try different add-ins. Thank you!
Thank you for your kind words and tip with GF flour. Enjoy the scones!
I made it GF by weighing my GF flour and it worked! So thank you for including the weight.
For my mix-ins I added lavender, lemon rind, earl grey tea granules and frozen blackberries.
Very moist and buttery yet light. Looks, smells and tastes wonderful!
So happy to hear that and what an aromatic flavor combo! Yum
I have tried several recipes and this one is the best. Some helpful hints from other recipes…
Freeze the butter and use a grater to add to the flour
Freeze the dough while preheating the oven and cook for a few extra minutes
This is my go to scone recipe!! Simple and amazingly delicious! A bit crunchy on the outside and soft and moist in the middle. These are so much better than what our local bakery sells!! Theirs are dry and tasteless – say nothing about the cost!
Pretty good base recipe to play around with. I did lemon zest and blackberries as my add-ins and felt the flavor was lacking so I added a lemon glaze. The scones have a nice texture and crunch on top, but tasted a little too floury to me.
So good. I put a glaze on mine with the blueberries and white chocolate chips. Wasn’t necessary.
This is a very good recipe. Proportions and timing are all right on. I added chopped strawberries and whole blueberries, about a cup and a quarter total. I used half and half instead of buttermilk and they turned out just fine. -Jim
Good scone base recipe! I added crispy turkey bacon and scallions.